Last updated on October 18th, 2022 at 12:06 pm
Summary: In following article we’ll discuss QuickBooks error code H202. We’ll also discuss the reason for the error and how it can be resolved with manual techniques and QuickBooks recovery software.
If you switch QuickBooks to multi-user mode receive error codes H202 when using QuickBooks. This usually means that the multi-user connection with the server computer, which is responsible for storing QuickBooks corporate files (QBW) is blocked. Unable to connect to the server computer prevents you from accessing your QuickBoooks corporate file.
What exactly is QuickBooks Error H202?
In a multi-user network QBW company file are saved on the server computer. Other computers that are connected to the network (that do not host QBW file) are referred to as workstations. When a workstation cannot access a corporate file stored on a different computer, it causes an error H202 in QuickBooks. The error message is as the following:
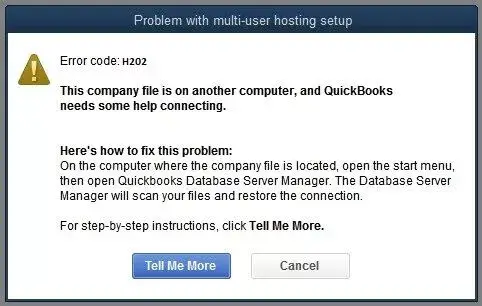
The company file is stored on a different computer and QuickBooks needs assistance in connecting.
Here’s how you can solve this issue:
On the PC where the company file is stored, go to the start menu, and then start QuickBooks Database Server Manager. This Database Server Manager will scan your files and then restore the connection.
Reasons why QuickBooks Error H202 occur
QuickBooks error code H202 is displayed when QuickBooks Desktop attempts connect with the company’s file but isn’t able to connect to the server because of some of the causes:
- Incorrect configuration of hosting settings.
- The firewall of the server computer is blocking outgoing and incoming communications.
- Problem between DNS servers.
- QuickBooks cannot find its IP address from the hosting system, or server hosting the company’s file.
- Certain internal QuickBooks services, such as QuickBooksDBXX or QBCFMonitor can’t be run on the server PC.
- Files for network information (.ND) is corrupted or damaged.
How to fix QuickBooks Error code H202?
Note: Prior to implementing the steps described in this section, be sure that you back up to your QBW file. By doing this, you will be able to ensure you will be able to return and restore your original data.
Intuit recommends that you use QuickBooks Database Server Manager. QuickBooks Database Server Manager to correct the error. If you’ve already tried and are still receiving the H202 error then try these solutions:
Note: For best results, apply the steps in the order shown below.
Solution 1 . Test Network Connectivity
You can connect to your server using the workstation that is displaying error H202, to test the connection to the network.
Note: If you don’t know your server’s name, you’ll have to enable “Network Discovery” on the server’s or any other workstation that is receiving an error.
Take these steps in order to Ping your server:
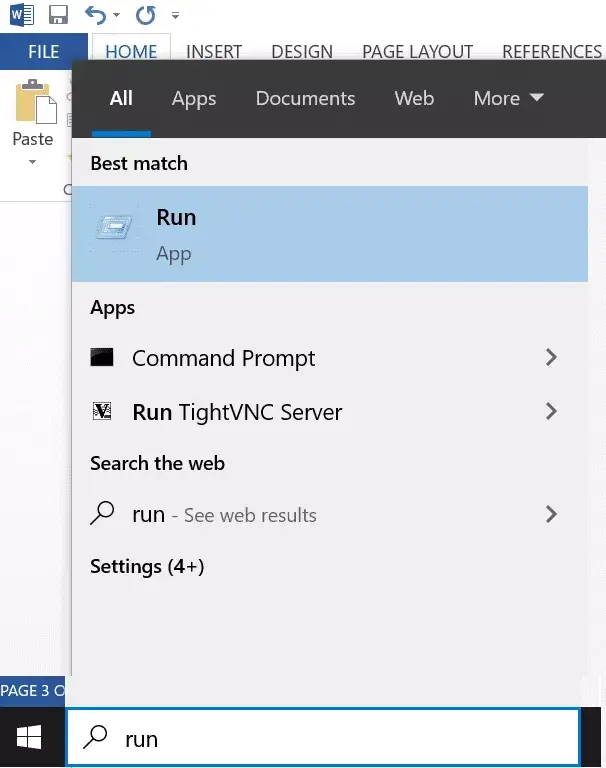
- Enter run in the Windows search bar to open the the Run window.
- On the Run window in the Run window, search for cmd into the search box and select on Enter..
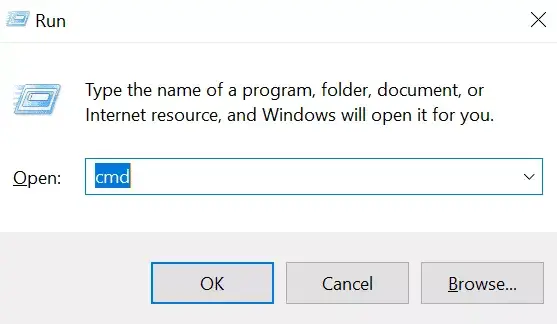
- Use ping[servername] in order to connect to the server’s name from your computer, then press Enter. enter key.
Important: Make sure you ensure that there is space between ping and the server name. Don’t put brackets around your server’s name while performing this procedure.

If you notice a loss of packets or receive a slow response this means that the network is in need of repair. If that is the case, go to Solution 2.
Solution 2 – Use QuickBooks File Doctor tool
Use the QuickBooks File Doctor tool to fix problems with the network that could hinder multi-user connections with the servers.
When the QuickBooks error H202 is still present, try the following method.
Solution 3. Set up your Firewall settings to QuickBooks Desktop
Verify that the server firewall settings on your computer aren’t blocking QuickBooks. Check out the article ‘ Configure Firewall and Internet security settings for QuickBooks Desktop’ for more in-depth instructions on how to enable QuickBooks ports to the firewall.
After you’ve configured the firewall’s permissions, you can try opening QuickBooks on your computer with multi-user access. If the problem continues you can try the next solution.
Solution 4 – Check your QuickBooks Services are Running
Check that it is confirmed that QuickBooks processes are operating on the server’s PC. Follow the steps listed below to determine if the QuickBooksDBXX services are running. then repeat the steps to run QBCFMonitorService.
- Enter “Run” in Windows’ Windows search box.
- In the the Run window In the Run window, in the Run window, type services.msc, and then press Enter.
- In the Services Window open a browser through the list and then double-click QuickBooksDBXX in the list.
Note: XX notes is the version that you use in QuickBooks.
- In the QuickBooksDBXX Properties window appears. Choose Automatic as the type of startup.
- The Status of the service should be set to running or Startted. Or else, select Start.
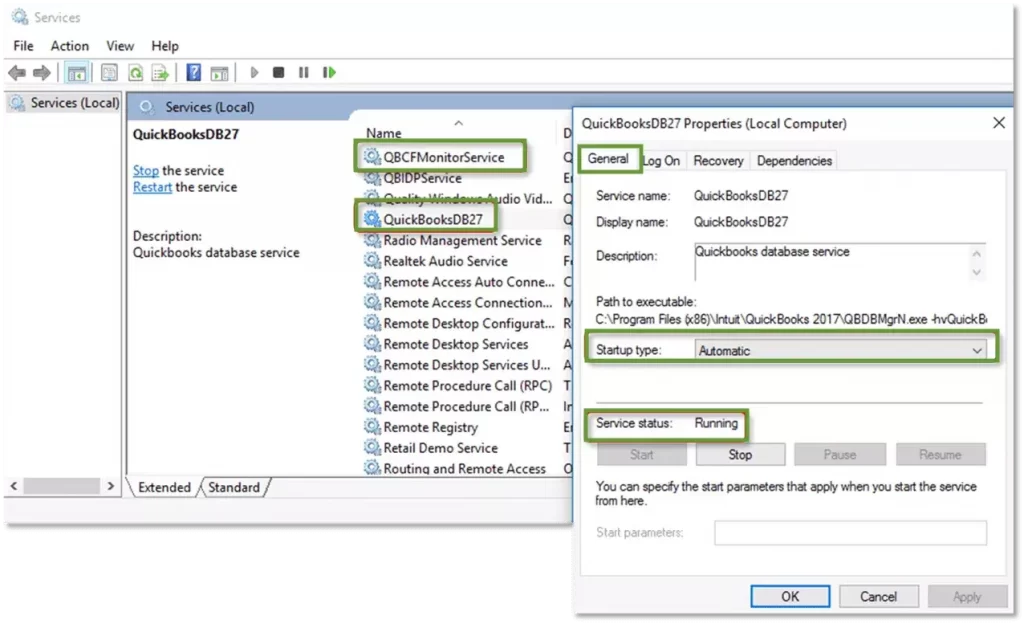
- Then, select the Next, select the tab.
- Select Restarting the Service from the Three drop-down menus. first failure, second failure and the subsequent failures.
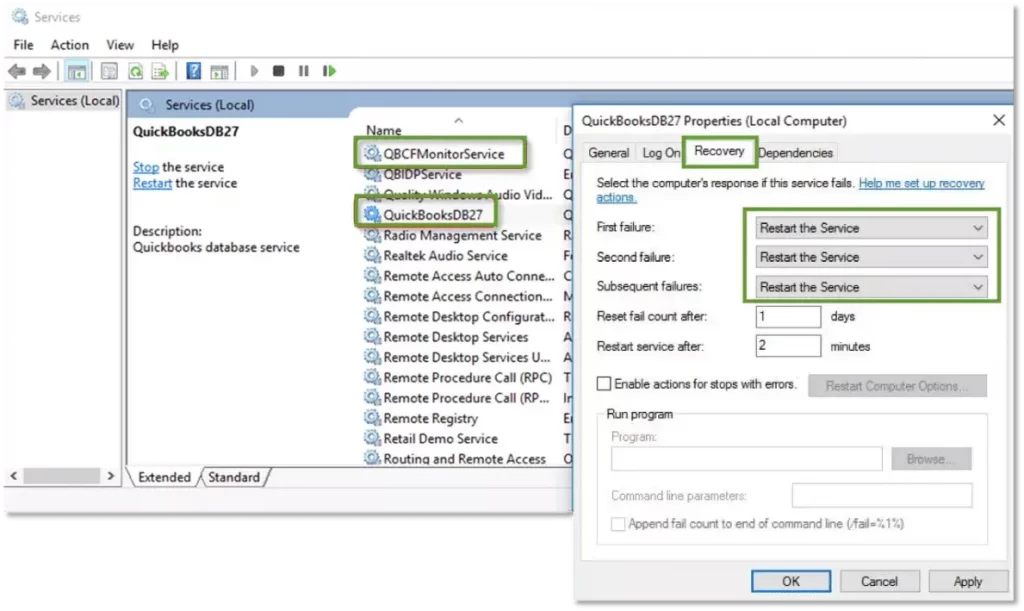
- Then click Apply after which select OKto save the modifications.
Repeat the steps to install the QBCFMonitorService. After you’ve completed the steps then start QuickBooks for each computer. Select on the file menu and select the Switching to Multi-user Mode option. If you can access everything, the issue is solved.
Solution 5: Add your server to the Windows Host file
In order to add your computer’s server in your Windows hosts directory, you’ll need to modify the file. To do this you must take these steps:
- Choose one of the possible paths below for opening windows hosts. Windows hosts files (on the system that displays an error):
C:\Windows\System32\Drivers\Etc.
C:\Windows\Syswow64\Drivers\Etc.
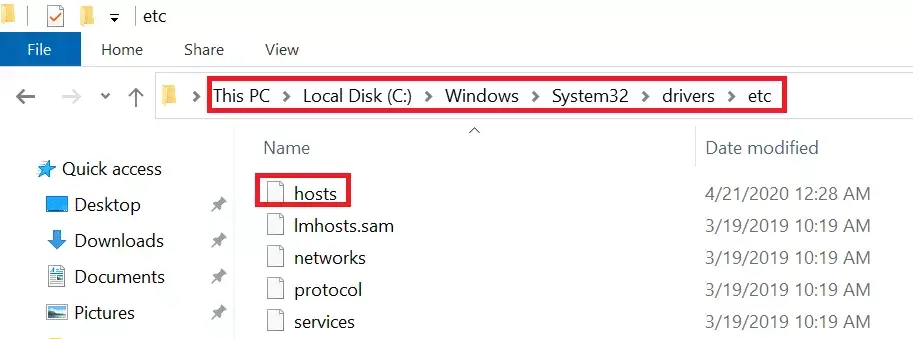
- Double-click on the host file.
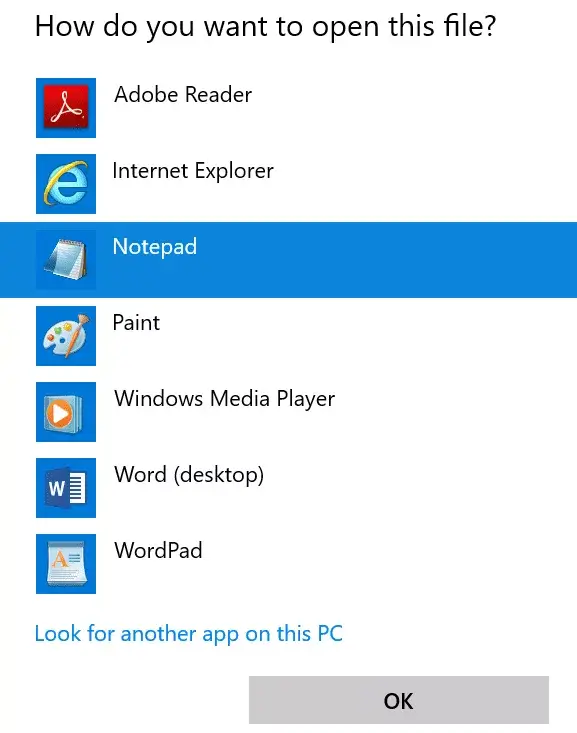
- If you are prompted with ‘ How do you would like to open this document? Choose the Notepad option..
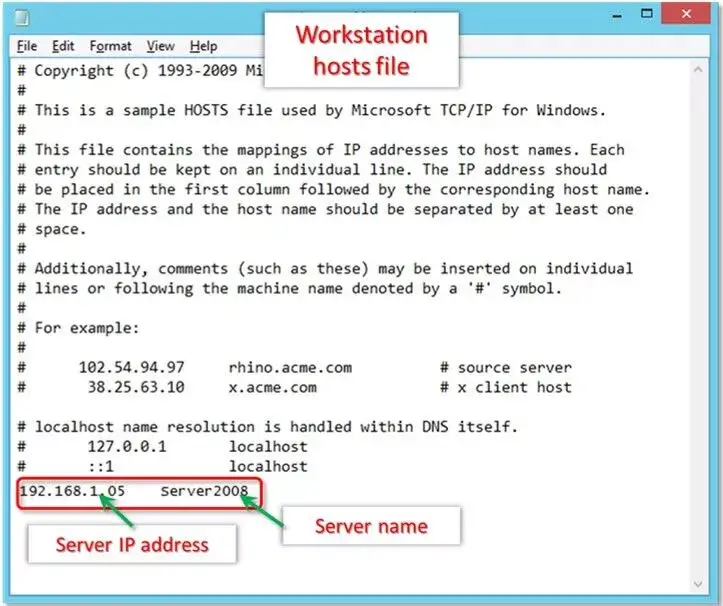
- Within the host file following the IP address of the last in the hosts file, enter the IP address of Server followed by the server’s name.
Note:Use TAB key instead of space bar to separate IP address and server names.
- On in the File menu, choose Save.
- Hit for exit.
After you’ve completed the above steps after which, try opening the file of your company in multi-user mode. If that doesn’t work then proceed to the next option.
Solution 6: Create a New Folder to your QBW File
The next step is creating a brand new folder to store your QBW files:
- If you are on the server’s computer you can create an entirely new folder.
- Share the folder, and establish the folders and Windows access rights to share company documents.
- The QuickBooks Database (QBW) file into this new location.
- Start your company’s file using multi-user mode once more.
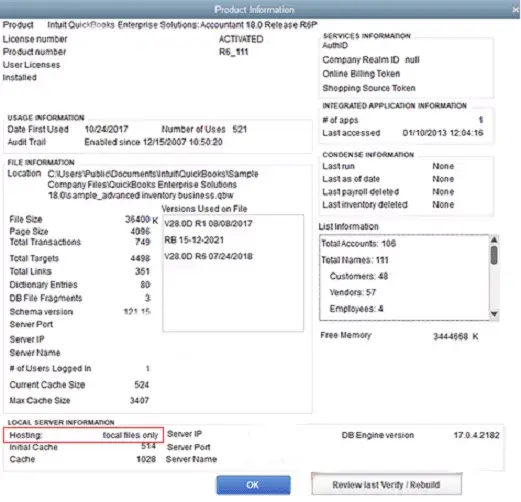
Solution 7: Change Hosting to Local Files
These steps will guarantee that any other client system is not in the process of hosting the exact company file:
- Start QuickBooks and hit F2 to display the Product Information screen.
- On the left side, choose hosting to display ‘ Local files only under Local Server Information..
Solution 8: Start QuickBooks the Database Server Manager
Many QuickBooks customers have reported they had to restart Database Server Manager helped them to fix the H202 error in QuickBooks. Here’s how:
- In the Run window then start typing services.msc, and then click OK.
- Click right-click QuickBooksDB19 (2009), QuickBooksDB18 (2008)or QuickBooksDB17 (2007) and select Stop.
- Right-click and choose the option to start. Then , close the window.
- Display extensions for well-known file types.
- Right-click on the Windows Start button and choose the Explore option. Options > Tools> Options for Folders.
- Go to on the “View” tab and then clear extensions in” well-known file formats box.
- Click on the tab View, then click the tab, choose Show hidden folders and files Then, clear of the ” Protect operating system data box.
- In the the Warning window In the Warning window, click Yes Then click OK..
- Shut down Windows Explorer.
Solution 9: Delete and recreate this .ND file
Try deleting and creating your infected .ND file to correct the problem:
- In the Windows search box in the Windows search box, type *.ND, and then press the Enter key..
- Within the Results window, right-click the .ND file and then click delete.
- When asked, confirm deletion.
- Then, click on next to click the Windows Start button.
- Click all programs to QuickBooks > QuickBooks Database Server Manager.
- Click on the Scan Folder tab.
- Simply click to Add Folder and browse through the file folder of the company.
- Select the company’s file and then click on the “OK” button. The route to the company file is located in the Folder section with QuickBooks company files field.
- Select Scan to begin scan process.
- When the scan is finished After the scan is complete, then click to close.
What Other Things Can You Do?
If the issue persists after applying all the solutions above You can reach out to our QuickBooks help desk to get assistance.
Don’t forget that applying the above methods wrongly could result in data loss. It is therefore recommended to backup your company’s file. However, if you believe that your company’s data is damaged or is corrupt, then using QuickBooks Data Recovery Software will aid. It can also assist you eliminate any mistakes out of the QBW file as well as your QuickBooks application.
Why Should You Use Stellar Repair to QuickBooks software?
- The sophisticated QuickBooks File Repair Software can repair badly damaged and corrupt QuickBooks (QBW) files without making any changes to your original QuickBooks file.
- Helps to eliminate repeated errors, application freezes and the risk of losing data.
- Retrieves all the data of the business, its customers as well as vendors and employees.
- Interactive user interface scans QBW file and shows an overview of the recoverable data.
- Recover data from QuickBooks backup files (QBB)
- Supports QuickBooks 2021 as well as all lower versions.
The Final Words
The QuickBooks error code H202 could be difficult to fix. But, with the correct solutions at hand you can get over it , along with other issues to continue working on your QuickBooks financial transactions, without interruption. This article will provide all the ways to eliminate this QuickBooks errors H202. However, you must backup your QuickBooks corporate data and have Stellar Repair for QuickBooks(r) software on hand to repair this QBW files and retrieving the information.

One thought on “How to Fix/ Resolve QuickBooks Error Code H202”
Comments are closed.