Last updated on June 9th, 2022 at 04:55 am
There are a variety of benefits that are included in the cloud-based platform, i.e., Office 365. One of these is the possibility of shared mailboxes. A Office 365 administrator can create an shared mailbox at any time using the Office 365 interface and assign the members they want to join it with full rights to access the mailbox’s information (share as well as receive it). To share meeting information as well as other information about events the shared mailbox has a calendar features and calendar feature. The most significant aspect that the mailbox shared within Office 365 is that the administrator does not require a license to use it, if it is able to hold data for up to 50GB. However, for storage that is greater than 50 GB of data the license must be purchased.
Office 365 allows converting the regular mailbox to a shared mailbox, and then returning to the user’s regular mailbox. What is the reason for this change? Let’s explore a situations.
Scenario 1: In the event that the business requires sharing a specific data from the user’s mailbox to multiple users, and needs working on the same project with the data.
Scenario 2: If an employee who was terminated has left the company and his email address with a valid license needs an archive of his data. To release the license and also to reference data the conversion process can be performed.
scenario 3: In the event that a manual migration technique like cut-over or staged is carried out while migrating onto Office 365, the shared mailboxes are migrated to the user mailboxes. The mailboxes are functional for 30 days with no the need for a license. To save the cost of license, it is possible to convert the user mailbox into a shared mailbox.
Each scenario suggests the necessity of changing from an Office 365 user mailbox to shared mailbox. The next part, we’ll discover how to convert a user mailbox into a shared one.
Important: One important point to remember prior to beginning this process is that your user’s email must be assigned a license and the password must be reset prior to changing into a shared mailbox. In the event that it is not, the conversion option is not visible. Don’t erase the user mailbox following the conversion because the shared mailbox will require it to act as an anchor in order to work. If you plan to store more than 50GB of data in your shared mailbox, you must have a license given to the mailbox. In addition, there should not be any changes to the established rules once the mailbox is transformed to a shared mailbox.
To convert a normal mailbox (with the assigned license) within Office 365 to a shared mailbox, follow the required steps.
1. Log in onto Your Office 365 account with the global administrator’s credentials.
2. Select the Admin option on the open interface.
3. It is when the Office 365 Admin Center window will be opened. There, select the Active Users.
4. Select the user’s mailbox to be converted from the drop-down list and select the Mail Settings option.
5. After that, click the”Convert it to shared mailbox” to convert it to a shared mailbox.
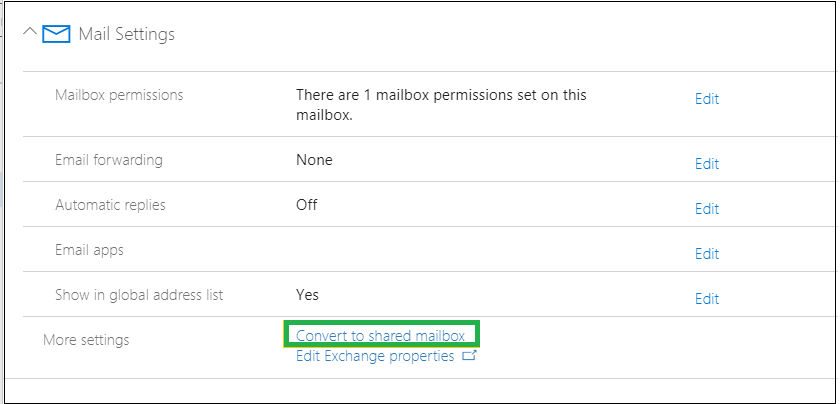
6. Final confirmation messages will be displayed. Click Convert to confirm.
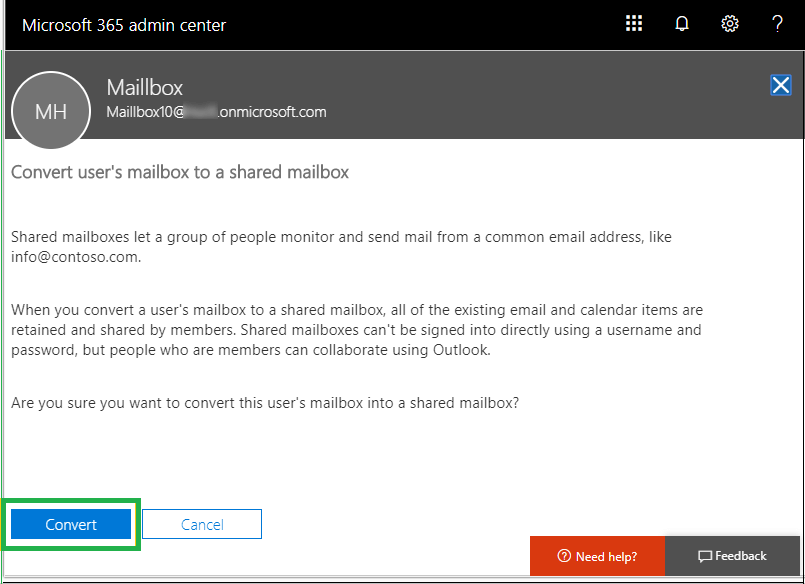
7. The message indicating the successful conversion of the user mailbox into shared one will be displayed. Click the Close button.
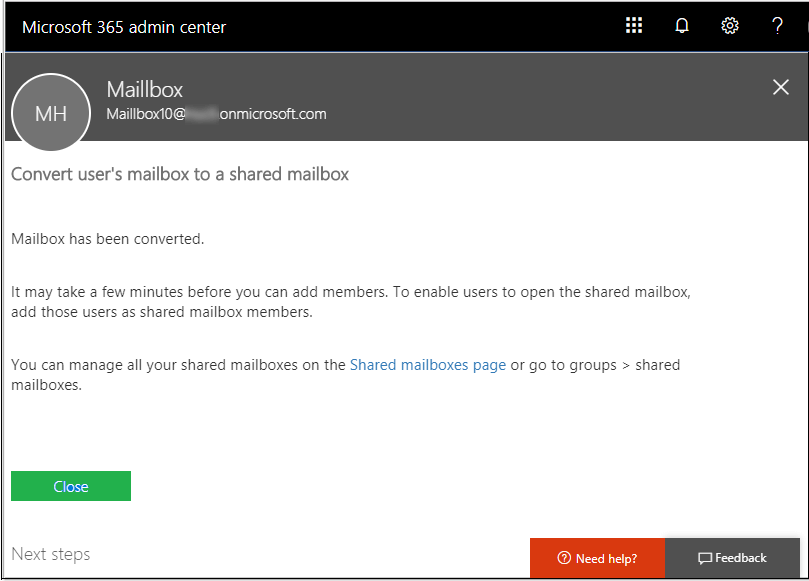
8. Then, you will be able to discover your new mailbox under the Shared mailboxes category.
NOTE: If the user mailbox is not larger than 50GB, you can request lower license count for billing after the license is removed. It is also recommended to block sign in to a shared mailboxes to protect.
This requires connecting Exchange Online PowerShell with the global administrator credentials , and the assignment the recipient Management as well as Management Role or Organization Management roles to an administrator. make the change from the normal user mailbox to the share mailbox within Office 365.
Connect first to first the Exchange Online PowerShell command using the below sequence of commands inside the Windows PowerShell run as administrator.
$UserCredential = Get-Credential
A dialog box will pop up. Enter to it your Office 365 accounts login credentials and then click OK.
Then, you can run this command to begin the session.
$Session = New-PSSession -ConfigurationName Microsoft.Exchange -ConnectionUri https://outlook.office365.com/powershell-liveid/ -Credential $UserCredential -Authentication Basic -AllowRedirection
The last command to be run is
Import-PSSession $Session -DisableNameChecking
Once you’re connected to Exchange Online PowerShell, you can execute the following commands for conversion.
Set-Mailbox -Identity -Type:Shared
In this case, you must provide your email address from the user’s regular mailbox to enable conversion.
Similar to that, the procedure to convert to the share mailbox into the user mailbox can be found in.
Set-Mailbox -Identity -Type:Regular
Sometimes, the scenario is changed, i.e., need to convert an existing shared mailbox into a the user mailbox is required. This is possible using the built-in Office 365 features. Let’s look at how.
1. Open Office 365 account by accessing the administrator account.
2. Navigate towards Office Admin Center and click on Exchange from the right panel.
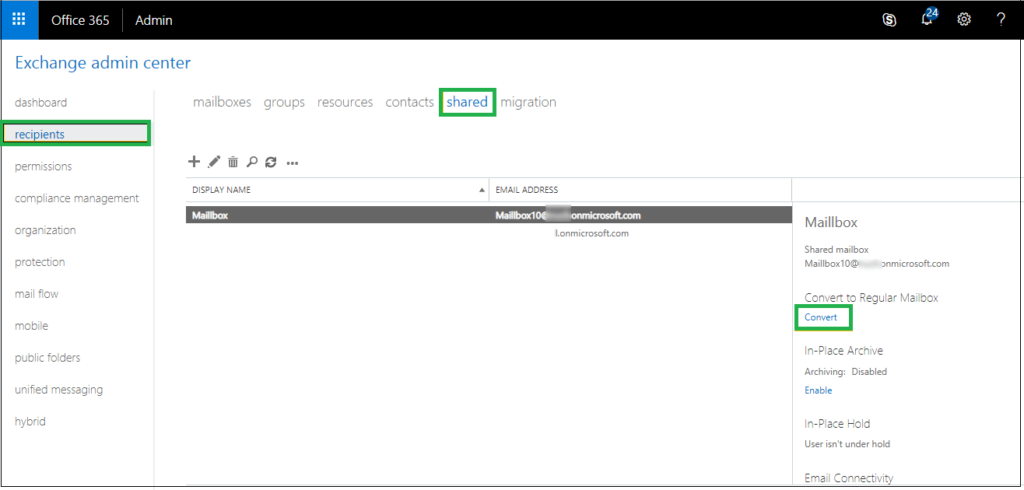
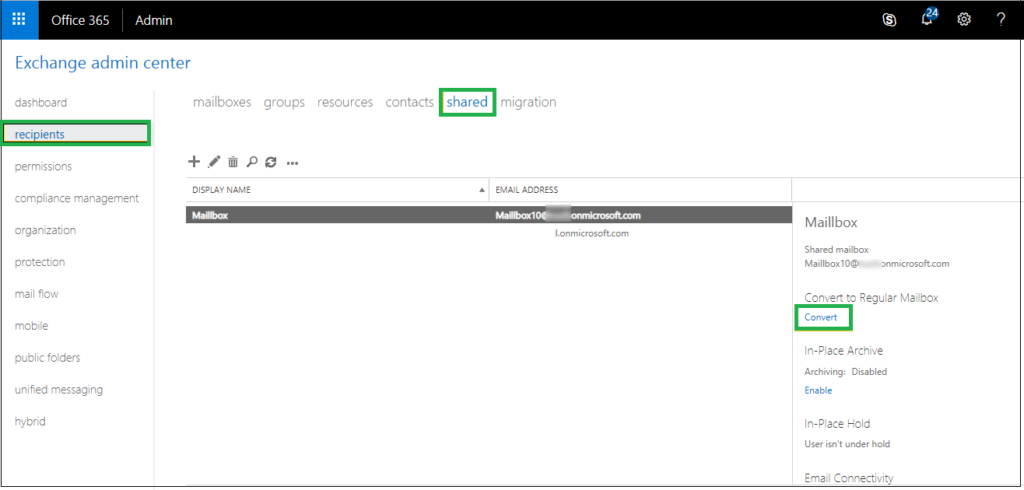
3. Then, go to the Recipient tab and select Shared. Select the shared mailbox you want for conversion , and then shift to the left-hand side. In the Convert section, select the Convert.
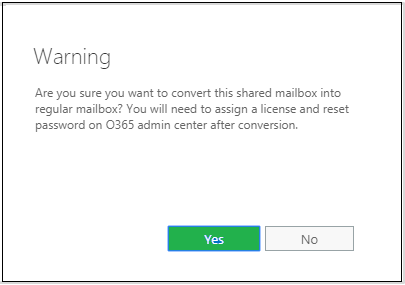
4. A final warning for confirmation will be displayed. Click Yes to continue.
5. The conversion process will underway. After some time, dependent on the volume of the data, the conversion process will end with an error message. Click Close.
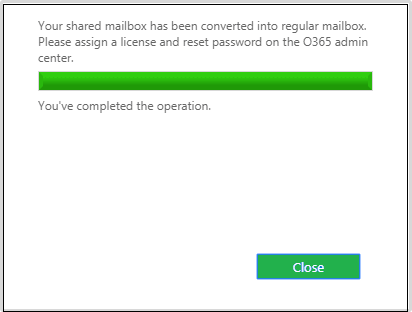
6. You can locate the converted user mailbox in”Mailboxes.
7. Don’t forget to assign the an account to this mailbox because it can be used for just 30 days with the license.
Therefore, users are now able to change a user’s mailbox to a shared mailbox or shared mailboxes to a user mailbox in Office 365. This method of manual conversion of mailboxes within Office 365 is easy to implement and is feasible. You can test it for a second time to see if you can confirm.
For those who need to backup of their Office 365 data including shared mailboxes to a safe location to prevent situations such as cybercrimes or hacking, data breaches, etc. You can use the most trusted software, Office 365 to PST software. It can easily backup the necessary data from all mailboxes of Office 365 to PST format on the location of the system. The user can always access this PST file from the Outlook application. It has a stunning interface that is easy to understand functions and iconography. The users can visit the official website of the program to get their minds more about the exclusive tool and download the trial version free of charge.
Final Words
Conversion from a regular mailbox to a shared mailbox, and from shared mailbox to regular mailbox within Office 365 is well displayed using the built-in Office 365 features. The importance of a license must also be thought of when changing the mailboxes. Office 365 data security concern is met by the advanced third party Office 365 backup tool which ensures the security of cloud data in a transferable Outlook PST file format flexibly.
