How to Recover Permanently Deleted Files for Free?
File deletion is a very common function that is used by a user (Windows). In general, users easily delete their files and folder using the Keyboard “Del”/”Delete” button or right-click a file or a bunch of files by choosing the “Delete” option. It is a very useful function that users use almost every day. But it also has its downsides. Users might accidentally delete an image, video, or folder without thinking through or clicking on the delete key or touch icon. The data deleted in these ways is sent straight to the Windows recycle bin. Also, not all deleted files go to the recycle bin, especially those deleted from the DOS command line. Also, files deleted with Shift + Delete also do not go to the recycle bin.

Here in this blog, you will learn how to recover such files using Microsoft Windows Recovery Tool. Before telling you more about the tool and the recovery method, you need to know how file storage file deletion works. After that, you can better understand how to perform file recovery.
What is a File System?
The file system is a process that defines how to store and organize data on a storage device. It is the logical component of the disk that manages the internal operations of a disk as it relates to the computer and is abstract to the human user. If the file system is not available, the operating system will not efficiently store data, identify where one data ends, another begins, and how a particular data unit is retrieved. A file system stores the files and manages memory management, file naming, directories/folders, metadata, access rules, and privileges. All the modern versions of the Windows Operating System supports file systems such as – NTFS (New Technology File System), FAT32, and exFAT.
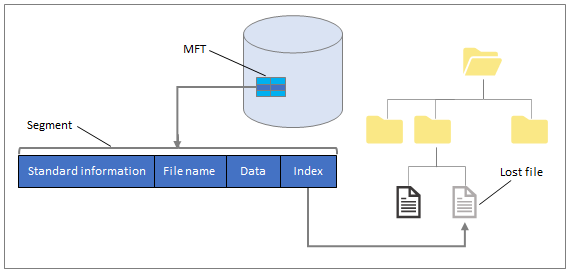
NTFS (New Technology File System) – NTFS is the latest file system is a process used by Windows to efficiently store, organize, and find files on your hard drive. It uses the MFT (master file table) to store file attributes such as file name, data, index, etc. A backup copy of the MFT is stored for backup and recovery purposes.
FAT32 – FAT32 is one of the oldest and more widely used file systems; it offers good performance even in very lightweight implementations but cannot deliver the same performance as the NTFS. It has a reserved area for basic format information and one FAT area for allocation table entry details.

exFAT – exFAT, also known as the Extensible File Allocation System, is another file system created by Microsoft, is optimized for USB drives and SD cards, and includes some improvements over FAT32. It is primarily designed to be used on portable media devices like flash drives, SDHC and SDXC cards, etc.
How does a File System store and delete data?
These file systems and even other file systems, such as the Apple File System (APFS), keep track of the data associated with any file, folder, etc. This information will be updated when changing the file or updating the attributes. Now when a file is deleted, the file data is not deleted. But the file system log is updated to verify that the deleted data can now be used or copied. All good file recovery software, including the Windows File Recovery tool, uses these records in the File System to detect and recover corrupt or deleted data.
It would be best to understand that data remains even when the file is deleted or damaged, but it cannot be easily accessible. Also, it is best not to use your system or disk for other purposes as long as there is a chance to overwrite the data, complicating the recovery.
What is Windows Recovery Tool?
Microsoft offers its own Windows Recovery tool, specially developed to repair/recover various corrupt and deleted data such as files, images, folders, and documents on local hard drives, USB drives, and SD cards. This Windows recovery tool allows users to restore data from FAT, exFAT, and ReFS file systems. This Windows recovery tool does not support data recovery from cloud storage or a network file system.
Modes of Operation –
Windows Recovery Tool allows you to recover files in three modes: DEFAULT mode, SEGMENT mode, and SIGNATURE mode. You need to know them in detail so that you can use the correct mode on demand. Let’s see the three modes of operation mentioned below:
<<Default Mode>>
It is suitable for recovering recently deleted files and locates files using the Master File Table (MFT). Without MFT and FRS, this mode cannot recover all data.
<<Segment Mode>>
Segment can recover files lost a while ago or after formatting your drive. It doesn’t use the MTF to generate results, though, and uses segments that include file summaries.
<<Signature Mode>>
This mode only works on external memory, such as a USB hard drive. It does not recover small files, nor does it require a file system structure to retrieve data. It directly searches for the required file types. It is best suited for non-NTFS storage devices.
Due to the different functioning of these operation modes, each is in a better position for recovery in a particular scenario. The users need to decide the right mode to achieve the best result.
Microsoft recommends you to use these modes by a File system and the circumstances as set forth below:
How to recover files using Windows Data Recovery Tool?
Note that, Windows Recovery Tool is a command-based tool that offers a command-line user interface. Therefore, and little command knowledge is required to use this tool. Let’s start.
- If possible, the tool must be a part of the Windows 10 suite. If not, download and install it from the Microsoft store.
- Open Start and Search Windows Data Recovery. Click on the resultant application.
- At startup, the application asks you to allow it to make changes to your device. Click Yes.
- Now, a command-line window will open. You need to enter one command to restore your file in the following format:
Winner source-drive: destination-drive: [/switches]
In this command,
- winner refers to Windows File Recovery,
- source-drive refers to the directory path where the required file(s) is/was located,
- destination-drive refers to the path to save recovered files, and
- Switches refer to a variety of additional options that you should use based on your requirements
NOTE: Source and destination drives do not have to be the same. Also, the tool will automatically create a folder named – Recovery_ on the destination disk. You can see the recovered files, which are saved within this folder.
Let us show some examples to cover a range of commands.
- Default Mode
- To recover abc.docx file in C: drive under Documents folder on a D: drive winfr C: D: /n \Users\\Documents\abc.docx
- To recover all the jpeg and png files under Pictures folder on a D: drive winfr C: D: /n \Users\\Pictures\*.JPEG /n \Users\\Pictures\*.PNG
- To recover Downloads folder from C: drive to a D: drive winfr C: D: /n \Users\\Downloads\
NOTE: For a folder, it is a must to keep the backslash in the end.
- Segment Mode (/r)
For segment mode, ‘/r/ is to be inserted in the command.
- To recover all PDF and Word files from C Drive to D drive winfr C: D: /r /n *.pdf /n *.docx
- Signature Mode (/x)
- For signature mode, ‘/x’ is to be added in the command. To find out the supported file types for signature mode winfr /#
- To recover ZIP files from C: drive to D: drive winfr C: E: /x /y:ZIP
We hope these examples give you a better idea of using the command to recover files using Windows Recovery Tool. However, this is not a cup of tea for everyone. Many other options need in-depth study to take full advantage of these commands. This can be a long and awkward option for many of us who have never used a command-line other than inserting commands.
Suppose the users are still struggling with commands and looking for a better and easy-to-use method to recover files. In that case, you can try third-party file recovery tools that use traditional Windows 10 graphical user interfaces.
Recover permanently deleted files with SoftMagnat Windows Data Recovery
Here we explain an easy and fast way to recover deleted files for free. If you also want to know how to recover deleted files, please keep reading this blog. This Windows Data Recovery (free version) tool is a one-time solution to recover any type of lost, deleted, or permanently deleted files. This Windows data recovery utility offers a simple GUI that allows you to select your hard drive and recover lost or damaged data in simple steps without any expertise.
It also provides a free trial version which efficiently works as same as the licensed version of this tool and allows you to recover 2 GB of data for free. Moreover, in this tool, you are not required to learn any commands for recovery. Users can use this tool from any background (technical/non-technical) without any issues. Here we describe the step-by-step process of how this tool works. Let’s start with:
The steps to help you recover deleted, formatted, corrupted data from Windows 10, 8.1, 8, 7 are listed below. Follow the steps:
Brief Guide for SoftMagnat Windows Data Recovery Tool:
- Download & Install Windows Data Recovery Software
- Hit on Scan and wait till the software completes Scanning
- Preview the entire scanned data into the software panel
- Either select the required data or Complete Data
- Provide a location and Save recovered data on Windows system
Conclusion
At the starting of this blog, we first understood what a file system is. Then we learned about the three major file systems used in the Windows operating system. Next, we explained to our users how they could save their file data using the file system. We have briefly described how the file system provides recovery tools to recover deleted or damaged files. We then switched to the Windows File Recovery Tool and its three modes. Next was the most important and challenging part of using Windows Recovery Tools.
We give separate examples for each operating mode and a sample of commands for each of these scenarios. Finally, we recommend the SoftMagnat Windows Data Recovery (free version) tool for those who want easy-to-use and faster solutions to recover their data files. We have introduced you to the working process of the tool with the help of screenshots to explain this tool better. I hope this blog helped you!
I am a Technical Writer at SoftMagnat Software and having experience around 8 years, focused on creating clear and user-friendly documentation for software products. I simplify complex concepts into easy-to-understand guides, manuals, and tutorials.


