What to Do When Office 365 Shared Mailbox Not Showing in MS Outlook?
There are many benefits of the Office 365 platform that you can take advantage of. You can attach multiple accounts to a single Outlook platform. Your Outlook account may have different mailboxes that are useful for specific purposes, such as Primary mailboxes, Archive mailboxes and Shared mailboxes, and so on. You can move your Primary mailbox data to Archive mailbox or Shared mailbox, but you need to create an Archive and Shared mailbox for this.
The shared mailboxes are the usual mailboxes multiple users use to read and send email messages in Office 365 accounts. A shared mailbox is not primarily connected to a single user and is mainly configured to allow access to multiple users. Whenever a shared mailbox user sends an email to another user, the user receives an email from a Shared mailbox only, instead of the sender’s mailbox. You can quickly identify a shared mailbox by its name, for example- contact@companydomain, info@companydomain, complaint@companydomain, share@companydomain.
If you have a shared mailbox in your Office 365 account but not displayed in Microsoft Outlook, you are missing some important emails that you need to accumulate.
Cause
It may happen that you can’t see the shared mailbox in Outlook once you move the on-premises mailboxes to Office 365 and also may not be connected to the shared mailboxes shared with you.
- The folder cannot be displayed.
- Microsoft Outlook is unable to locate the specified folder.
- The operation failed.
- An Object cannot be found.
The reason for the error may be due to the level of your permission. Suppose the administrator exercises the rights through dialogue Access. In that case, it refers that the administrator has only shared the default folders such as Calendar, Contacts, Tasks and Notes, Inbox, etc. Users can easily send or receive emails on behalf of the account. But that doesn’t mean the user can enter a shared mailbox on their Outlook account.
Workaround-1
The administrator must provide the user with an additional “File Permission” permission in the mailbox folder.
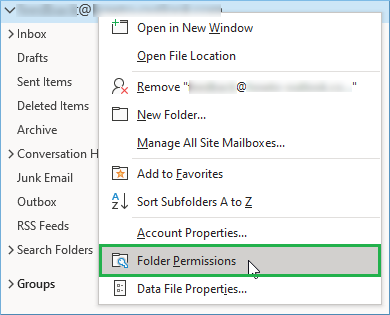
- The administrator must go to his account, right-click on it and select the folder permission.
- Now, move to the Permissions tab, select the user account you want to share the mailbox, and click the Add button.
- Select the Permission level and check the option “Folder visible” below the other category.
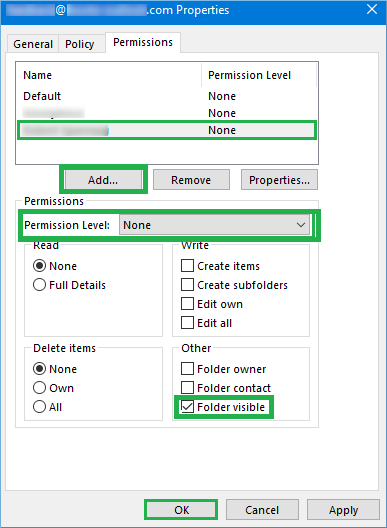
- Click on the Apply option and then OK.
Once the administrator has provided the necessary permissions, the recipient can easily add the folder to his Outlook account.
- Follow File>>Account Settings>>Account Settings>>Exchange Account>>Change>>More Settings>>Advanced.
- Select the Add button and enter the name of new mailbox
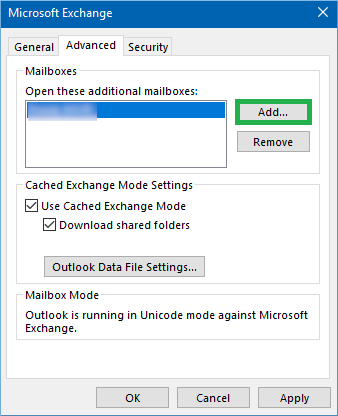
- Click the ‘Apply’ and restart Outlook. Check to see if there is a shared mailbox at the moment.
If you still do not see the shared mailbox, then you need to go through the problem-solving process in Outlook.
- First, start MS Outlook, go to File and move to Options and click on it.
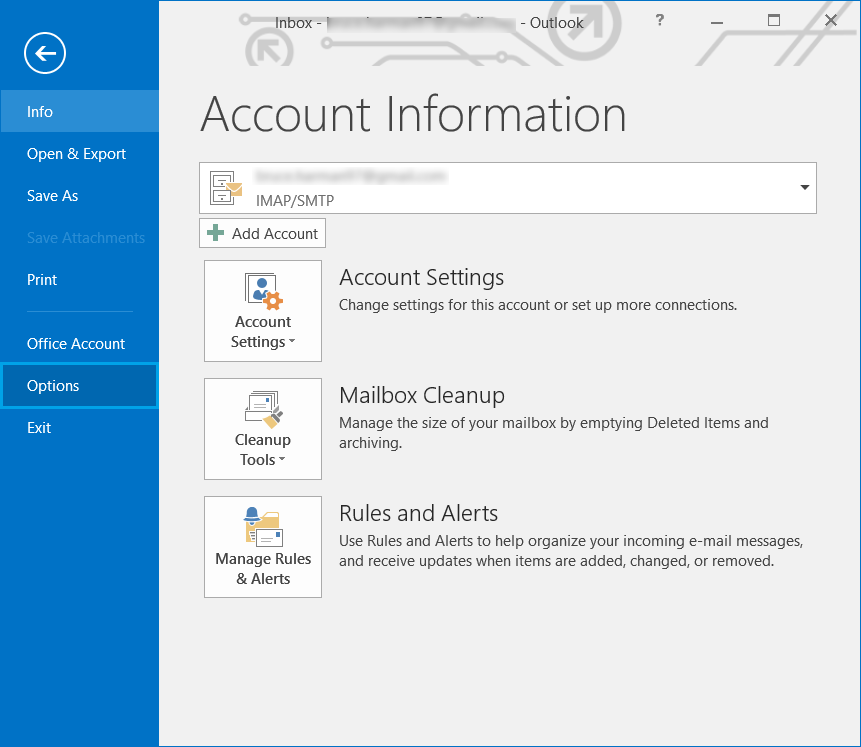
- Click on the ‘Advanced’ tab, check the option Enable Troubleshooting logging, and click on ‘OK’.
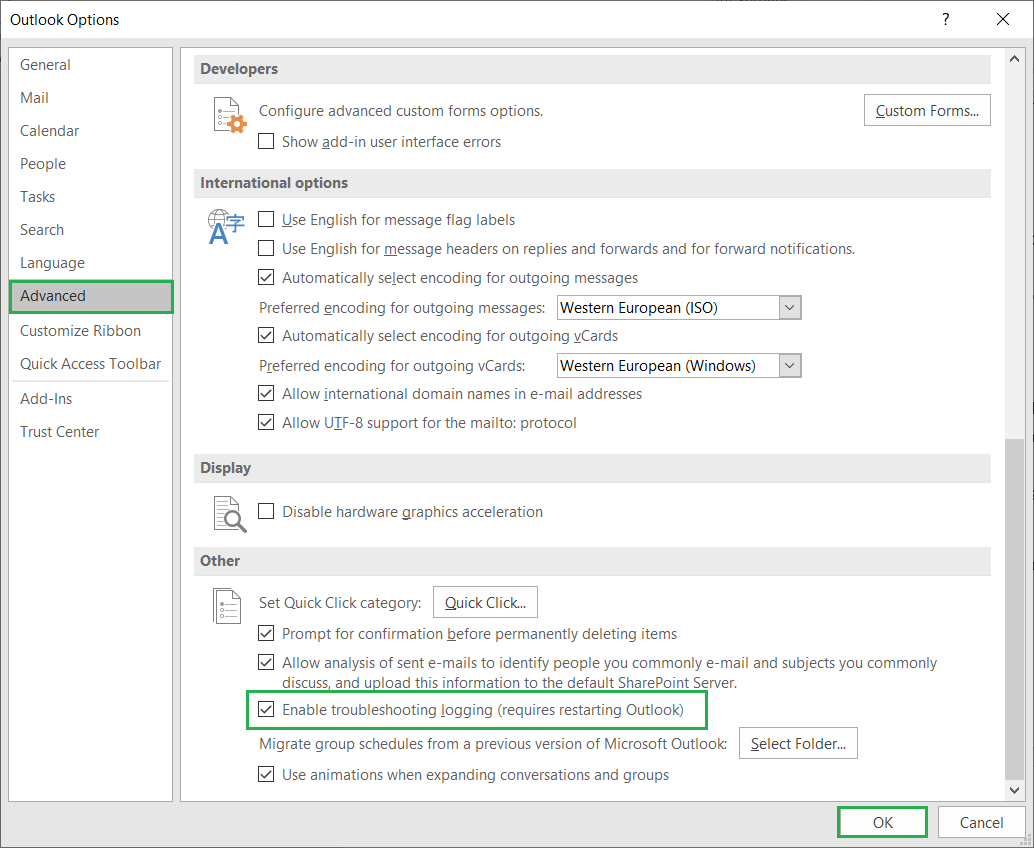
- Move to the temporary folder and check the recent logs that reflect possible errors in the absence of a shared mailbox. Then based on the mistakes, you can move on to solving further problems.
Workaround-2
Another method is available that looks a bit long, but you can try it quickly without hesitation. Outlook has an automatic map feature that locates the shared mailbox and will add it to your Outlook account. But the total size of the Outlook data file increases with the data, and once you exceed the 50 GB limit, then MS Outlook may stop transferring data from the shared mailbox. So you can disable the Auto-mapping feature in Outlook and add a shared mailbox as a normal mailbox.
Follow the simple steps given below:
- First, connect Exchange Online account by using the command- $Credential = Get-Credential
- Enter the Office 365 login details in the prompt up box.
- Now connect to the Exchange online
- $ExchangeSession = New-PSSession -ConfigurationName Microsoft.Exchange -ConnectionUri “https://outlook.office365.com/powershell-liveid” -Credential $credential -Authentication “Basic” –AllowRedirection
- After that, you need to Import the session of Exchange
- Import-PSSession $ExchangeSession
- Now remove the permissions for the shared mailbox.
- Remove-MailboxPermission -Identity complaint@domainname -User tony@domainname -AccessRights FullAccess
- Once you remove the permissions, delete the shared mailbox that has been shared with you. And move to Account Settings, select your account and click the ‘remove’ button.
- Now you still need to assign full access permission.
- Add-MailboxPermission -Identity complaint@domainname -User tony@xyz.com -AccessRights FullAccess -AutoMapping:$false
- Finally, now you can add a shared mailbox as a normal account and access its data.
Wrapping up – Office 365 Migration Tool
All of the methods we’ve talked about so far allow you to view your shared mailbox in MS Outlook, but if you have any problems accessing the mailbox, even after using the above methods. Then it would help if you had a proper migration program specifically designed for Office 365 migration tool. The Professional Migration software quickly solves all the permission level issues and migrates all the mailboxes on the accounts you want.
I am a Technical Writer at SoftMagnat Software and having experience around 8 years, focused on creating clear and user-friendly documentation for software products. I simplify complex concepts into easy-to-understand guides, manuals, and tutorials.


